I'm not sure that you could call this a post today, maybe teaser is a better description. But here are a few pictures of cakes I have made in the last year or so. Some of these I will be posting tutorials on, if you have any specific questions feel free to shoot me a comment and I will get back to you. Hope you enjoy!
Okay, so one is a cookie cake, but what can I say my nephew doesn't like cake!
Thursday, January 8, 2015
Thursday, January 1, 2015
Happy New Year! And here is to Resolutions
So today is New Year's Day. That means it is the day for resolutions to be made. I have to admit that I have made a few this year, but the one to get my greatest attention is definetly to make this the year I focus on this blog. Last year I had the best intentions, heck I have a phone full of pictures for post. Unfortunately, they just never seemed to make it from my head and my phone onto the page. This year that will change! Goodness me it isn't like I don't already have tons of ideas to enter so I am pledging to "get 'r done!"
Now, what am I sharing with you today? I want to share one of my other resolutions, and that is to work on de-cluttering my home. This month that includes a challenge from Clean Mama and the Country Chic Cottage here . I love the idea of a new (quick) challenge each day to jump start this process. Today, was "3 bags." I gave each member of my family a bag and said to go to your room and bring a bag back of something that you can get rid of. For my oldest son that was going through his old school books that were still cluttering his book case, he managed to get rid of a half milk carton of books and half a bag of trash. My youngest son went into his closet and pulled out a bag of clothes he no longer wears or doesn't fit anymore. This one has grown so much in the last year or so I would bet I could find some more but hey a mom has to be grateful for the bag being full!
And for the piece de resistance......my husband and I each with a bag in hand tackled our bedroom bookshelves! I don't know about the rest of you but for us open shelving has an ugly habit of becoming a catch all. Especially, for my dear husband, but I won't tell him hehehe!
I must admit though I had a whole lot of books up there for homeschooling that our boys had outgrown a long long time ago. Of course, there was all the wonderful novels that I thought some day they would read and enjoy soooo much! Well that never happened and I'm not holding onto them any longer. I wish I could say that my boys are avid readers, but that would be a lie. They are both very good readers and if they really get into a book they will read it happily, but with our busy school schedule I know that I won't have a chance to push extra books, so away they go.
Yes, it made me a little sad because I love books, but now seeing all that empty space on my shelves makes me very very happy! And the best part is we ended up with two bags of books and a bag of things that we trashed. Hooray for us!
In the end we ended up with four and a half bags to go and half a milk carton. It really didn't take the boys even a whole 30 minutes the challenge set out. Hubby and I probably were pushing 45 in the end, but who cares it is done and we didn't mind the little extra time to get it completed.
Here is the fruit of our labors:
The clothes will get donated, the trash will go out to the can in the morning and the books will go into the mountain I have in my old classroom for the book sale I still have to find this spring. Ugh, another resolution :)!
So if you want to join us in this process just click on over to join the challenge! I would love it if you comment and let them know that I sent you!
Now, what am I sharing with you today? I want to share one of my other resolutions, and that is to work on de-cluttering my home. This month that includes a challenge from Clean Mama and the Country Chic Cottage here . I love the idea of a new (quick) challenge each day to jump start this process. Today, was "3 bags." I gave each member of my family a bag and said to go to your room and bring a bag back of something that you can get rid of. For my oldest son that was going through his old school books that were still cluttering his book case, he managed to get rid of a half milk carton of books and half a bag of trash. My youngest son went into his closet and pulled out a bag of clothes he no longer wears or doesn't fit anymore. This one has grown so much in the last year or so I would bet I could find some more but hey a mom has to be grateful for the bag being full!
And for the piece de resistance......my husband and I each with a bag in hand tackled our bedroom bookshelves! I don't know about the rest of you but for us open shelving has an ugly habit of becoming a catch all. Especially, for my dear husband, but I won't tell him hehehe!
I must admit though I had a whole lot of books up there for homeschooling that our boys had outgrown a long long time ago. Of course, there was all the wonderful novels that I thought some day they would read and enjoy soooo much! Well that never happened and I'm not holding onto them any longer. I wish I could say that my boys are avid readers, but that would be a lie. They are both very good readers and if they really get into a book they will read it happily, but with our busy school schedule I know that I won't have a chance to push extra books, so away they go.
Yes, it made me a little sad because I love books, but now seeing all that empty space on my shelves makes me very very happy! And the best part is we ended up with two bags of books and a bag of things that we trashed. Hooray for us!
In the end we ended up with four and a half bags to go and half a milk carton. It really didn't take the boys even a whole 30 minutes the challenge set out. Hubby and I probably were pushing 45 in the end, but who cares it is done and we didn't mind the little extra time to get it completed.
Here is the fruit of our labors:
The clothes will get donated, the trash will go out to the can in the morning and the books will go into the mountain I have in my old classroom for the book sale I still have to find this spring. Ugh, another resolution :)!
So if you want to join us in this process just click on over to join the challenge! I would love it if you comment and let them know that I sent you!
Monday, June 16, 2014
Closet Part II - Drawer dividers
In my last post you got to see my wee little closet. I absolutely need a change. So I started with purchasing some Ikea drawers while they were on sale in January.
Now, these are my old ones, but they changed their design just enough that I had to get two new ones in order to stack them. No worry though, I am going to use these with my sewing stuff.
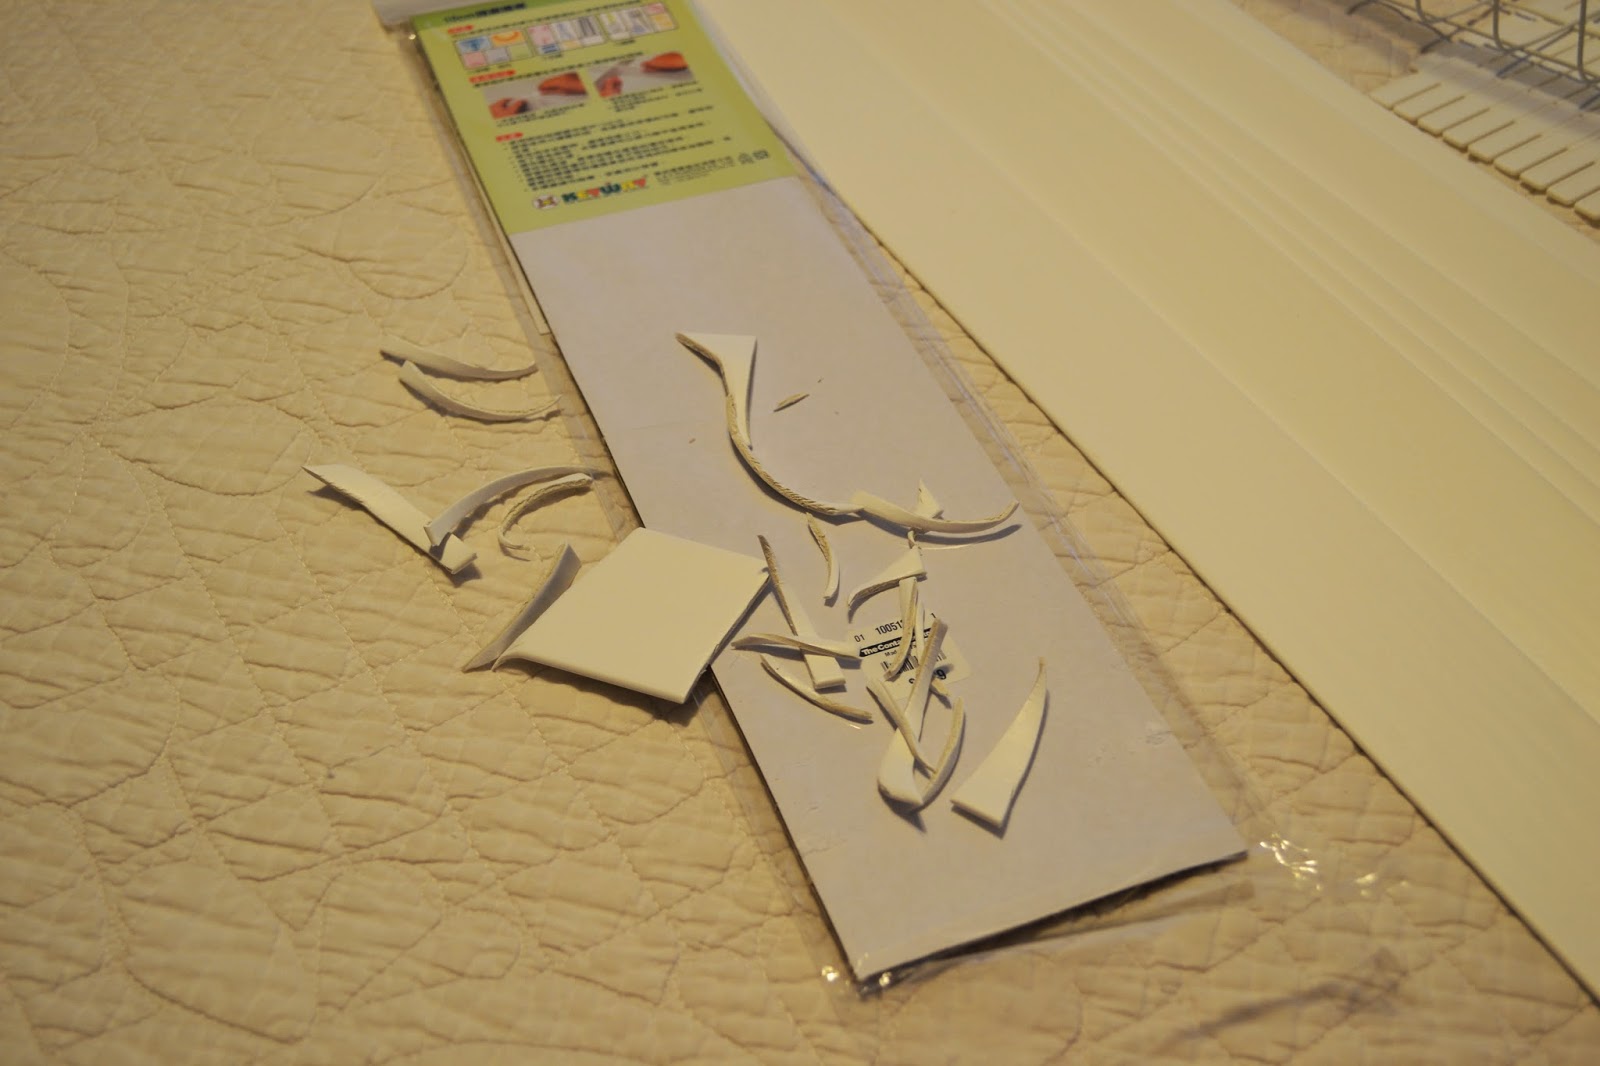
I love drawer dividers but to be honest they really start to add up quickly and I am doing this on a very tight budget. So, I got this one from the Container Store to see how I could go about making something similar. This is the cheapest one they had.
Excuse the mess in this shot but I was excitedly already creating when I realized I forgot to take the picture.
The top piece came in the kit and the other two is what I came up with. Are you curious as to what I used yet?
It is actually, the extra slats from the bottom of my faux wood blinds. My husband had taken these off to fit better when we were working on the bath. They worked perfectly! They cut with scissors and fit together easily.
Now, you can see that I eyeballed the cuts and made some bigger that other. The only thing is that once you have done the first for that drawer going either direction you have to use it to mark the others for that drawer. They do give a little so it doesn't have to be perfect, but try and get as close as possible.
Once, they are all cut for that drawer assemble it. I really suggest that you do one drawer at a time so that things don't get mixed up. Then just start filling it up!
You can see in this picture that the store bought one is really tall. So I took it out and used only the slats. That gave me enough room to add a dollar store basket with its own slats.
I have really been enjoying them and the fact that I can find things in my drawers is WONDERFUL! I only have a few left but I plan to make tags for the outside of the drawers. Maybe that will happen before I finish the closet LOL!
Note: When you cut the slats you want to actually cut out a notch a little over half the width on both pieces that are going to fit together so that they come together smoothly.
Now, these are my old ones, but they changed their design just enough that I had to get two new ones in order to stack them. No worry though, I am going to use these with my sewing stuff.
I love drawer dividers but to be honest they really start to add up quickly and I am doing this on a very tight budget. So, I got this one from the Container Store to see how I could go about making something similar. This is the cheapest one they had.
Excuse the mess in this shot but I was excitedly already creating when I realized I forgot to take the picture.
The top piece came in the kit and the other two is what I came up with. Are you curious as to what I used yet?
It is actually, the extra slats from the bottom of my faux wood blinds. My husband had taken these off to fit better when we were working on the bath. They worked perfectly! They cut with scissors and fit together easily.
Now, you can see that I eyeballed the cuts and made some bigger that other. The only thing is that once you have done the first for that drawer going either direction you have to use it to mark the others for that drawer. They do give a little so it doesn't have to be perfect, but try and get as close as possible.
Once, they are all cut for that drawer assemble it. I really suggest that you do one drawer at a time so that things don't get mixed up. Then just start filling it up!
You can see in this picture that the store bought one is really tall. So I took it out and used only the slats. That gave me enough room to add a dollar store basket with its own slats.
I have really been enjoying them and the fact that I can find things in my drawers is WONDERFUL! I only have a few left but I plan to make tags for the outside of the drawers. Maybe that will happen before I finish the closet LOL!
Note: When you cut the slats you want to actually cut out a notch a little over half the width on both pieces that are going to fit together so that they come together smoothly.
Friday, May 23, 2014
A Real Closet Makeover Begins!
Now, y'all know that I like to keep it real. And, I have a really small master closet. No I am not being modest, no you are not going to scroll down and think, "My goodness it is bigger than my children's room!" Nope, it is small. I jokingly tell people that some people talk about their country home and the doggone thing ends up being an estate. I just say I have a home in the country, because that is what it is. A nice little house in the country. The main problem in my house is storage. The house was designed for up north where it should have a lovely basement. But this is Gulf Coast Texas, a basement would be a bog of red clay and water. It just doesn't happen here. So the storage is all very tight!
I have had several configurations to my closet and they have all been horrible. To be honest, though, a pretty new closet from a store is just out of my budget. So, I am trying to make as small an investment as possible. Here, is what we have been living with for several years, absolutely horrible. I think at some point I just got so frustrated that I just gave up and lived with whatever!
Now, the confession part hehehehe! This has been severely purged when I took this picture. I have already gotten rid of a bunch of clothes and several totes that were just stacked up at the end. Yes, that is new light fixture for my bedroom that I put together and hasn't been put up yet.
So over the next couple of weeks (okay, maybe months) I want to show you the transformation and the projects that helped to make the improvement. I wish that the end product was going to be three feet wider and a foot or two longer. Unfortunately, it won't but I think I have some ideas that will definitely work better and ascetically be more appealing. Of course, what wouldn't be :) !
I have had several configurations to my closet and they have all been horrible. To be honest, though, a pretty new closet from a store is just out of my budget. So, I am trying to make as small an investment as possible. Here, is what we have been living with for several years, absolutely horrible. I think at some point I just got so frustrated that I just gave up and lived with whatever!
Now, the confession part hehehehe! This has been severely purged when I took this picture. I have already gotten rid of a bunch of clothes and several totes that were just stacked up at the end. Yes, that is new light fixture for my bedroom that I put together and hasn't been put up yet.
So over the next couple of weeks (okay, maybe months) I want to show you the transformation and the projects that helped to make the improvement. I wish that the end product was going to be three feet wider and a foot or two longer. Unfortunately, it won't but I think I have some ideas that will definitely work better and ascetically be more appealing. Of course, what wouldn't be :) !
Thursday, April 3, 2014
Look what my wonderful husband did!
I am so excited to show you what my husband did for me recently!
Isn't it just a beauty!?! And actually, this is just the first of three that he recently built and installed. He was able to whip this out in a matter of a couple of evenings (yes, that was after years of asking LOL!). Now, I don't have a tutorial for this but The Family Handyman does have a pretty good one. My hubby had built several of these out in his garage cabinets. I know that got done first, huh!?! And was fairly comfortable with this build.
Of course, I couldn't be happy with three the same. They are each different in size and function, but the construction was basically the same. I want to note here that as you can see in the picture he cut the center post out. We installed these counter tops ourselves and know that they are very sturdy. If you were going to do the same I would suggest checking with some tuts and seeing their recommendations.
Now, on with our tour!
This one was built specifically to accommodate my Kitchen Aid and Soda Maker. It is so wonderful to have a place to put them that they fit so comfortably. I would eventually like to have one of those swing out shelves, but I've been told they are fairly expensive and then my Soda Maker wouldn't fit. Speaking, of money. These slides can get rather expensive but we were able to pick most of ours up at the ReStore for next to nothing. Just make sure that they are heavy duty enough to support whatever you may want to put in your cabinet as well as that they slide easily and freely.
And them came the piece de resistance!!!(okay, maybe I'm not sure how to spell that, you get the jist)
My under sink has always been a disaster area and you could never find anything! Not anymore! Now I can actually pull it out and see what is in there. Believe it or not, I had three Jet Dry type product in there and have been using vinegar for month because I thought I was going through it to fast! Heck, I wasn't even putting it in UGH! We decided to stick with the wire baskets that I already had in there but hadn't worked as well as I had hoped. Then we added more small wire baskets that I had picked up. The ones on the left are from Ikea, I had been using them in my bathroom but sacrificed them for the kitchen. The one on the right came from the Container Store. They had a big sale back at the beginning of the year and I had picked it up then.
I hope you enjoyed a little visit to my latest life's joy! Please, feel free to leave a comment!
Thursday, February 20, 2014
I'm Back!
Before you start this post I must say in my own defense I wrote this post a couple of weeks back but could not for the life of me get the pictures to load. Finally, today I tried another server and boom it worked! So, I guess my kids have been right for some time and I will be forced to part ways with Internet Explorer :( So with no further adieu, I'm Back!
Okay, so I must admit that my little holiday break has turned into a whole stinking winter hiatus! Well, maybe not the whole winter but I have been away much longer than I intended.
I have to say though this break has actually been very, very busy in the real world. We have been knocking out little and not so little projects all over the house.
Do you ever have those little projects that just build up all over the place? I mean I have supplies for this project and that stuck in every nook and cranny!
Well, my oldest is the "neat" one in our house! And though, he loves to point out my own messiness, he does help to keep me from getting totally out of control! LOL! A few weeks back before his new semester started he and I got on a spring cleaning kick. In one week we cleaned out FIVE closets and my craft room/storage building. Okay, to be honest my kids call it my "crap building" instead of my craft building. Aren't they so cute ;)! And maybe sometimes (okay most of the time) it is true. You can come to my house for any function and find it looking pretty presentable but DON'T and I can't stress that enough look into my building. All those supplies for all those projects will definitely be shoved into a bag or box and dropped in the building!
So we cleaned out the building and guess what I found a whole lot more little projects than even I realized I had. I mean that is money sitting around being wasted in my book. And I can't stand to waste money. So my spring cleaning turned into project time!
Now, you all know that I am very new to the blogging world. So, some of the projects got really good pictures and some got the "Oh no! I forgot to take pictures" pictures! So here is a quick overview of a few of the small and not so small projects we have been working on! Stay tune and tutorials and overviews will be coming shortly!
Okay, so I must admit that my little holiday break has turned into a whole stinking winter hiatus! Well, maybe not the whole winter but I have been away much longer than I intended.
I have to say though this break has actually been very, very busy in the real world. We have been knocking out little and not so little projects all over the house.
Do you ever have those little projects that just build up all over the place? I mean I have supplies for this project and that stuck in every nook and cranny!
Well, my oldest is the "neat" one in our house! And though, he loves to point out my own messiness, he does help to keep me from getting totally out of control! LOL! A few weeks back before his new semester started he and I got on a spring cleaning kick. In one week we cleaned out FIVE closets and my craft room/storage building. Okay, to be honest my kids call it my "crap building" instead of my craft building. Aren't they so cute ;)! And maybe sometimes (okay most of the time) it is true. You can come to my house for any function and find it looking pretty presentable but DON'T and I can't stress that enough look into my building. All those supplies for all those projects will definitely be shoved into a bag or box and dropped in the building!
So we cleaned out the building and guess what I found a whole lot more little projects than even I realized I had. I mean that is money sitting around being wasted in my book. And I can't stand to waste money. So my spring cleaning turned into project time!
Now, you all know that I am very new to the blogging world. So, some of the projects got really good pictures and some got the "Oh no! I forgot to take pictures" pictures! So here is a quick overview of a few of the small and not so small projects we have been working on! Stay tune and tutorials and overviews will be coming shortly!
Wednesday, December 18, 2013
Burlap Frames
Hey, are you still looking for a few more handmade gifts for under your Christmas tree? Well today I have a great one that is easy and fairly quick. Though, I must tell you anytime that you start cutting burlap it gets messy quickly so be sure and work someplace that is easily vacuumed or even outside, weather permitting.
What you will need is a frame (mine is flat and wooden), burlap cut big enough to cover your frame and have a little extra all the way around. Then for adhesive you will need a spray adhesive and a glue gun. And don't forget the scissors and decoration.
Now, I have to tell you that my frame was, well, ugly when I bought it. I had already sanded it down and given it a coat of primer by the time I took this picture. Maybe you will get lucky and find something already in the shape to be covered.
I sprayed both the frame and burlap outside, according to the cans direction. Be sure you do this step outside preferably or in a REALLY well ventilated area. This is some stinky stuff. Then you want to smooth the burlap over the frame. When you do this you want to check out the lines of the fabric. No, I would not drive myself crazy to make them perfect, but your end result will be better if it doesn't look like it is all running down hill!
Now you can start folding the material over the edge. I start in the center on opposite sides and as I go I spread a thin bead of hot glue along the back edge of the side and up each corner. This will keep the burlap from unraveling once you trim it. Then trim the excess material. Now do the same thing to the other two sides.
Once the sides are secured and trimmed you will want to do the same thing in the inside. As you can see I cut a straight line in the center first, then diagonally into each corner. You are going to see as you are securing the burlap that the inside corners will not be completely covered. Trust me it will look fine once the frame is reassembled with glass and picture. Just make sure that you have it glued well and that you trim the burlap so that the glass can fit in flush.
Finally, embellish with your decoration and your frame is completed. I really love the finished look of these! I actually made some extras and will add them to our etsy inventory http://www.etsy.com/shop/TheEssenceOfSSS?ref=search_shop_redirect
Note: Please be sure to follow the directions on your spray adhesive. And never forget to respect the glue gun! It really is hot and you may want to use something like a plastic ruler to press your burlap down. The weave is so loose that it can get you pretty quick!
Friday, December 13, 2013
Christmas is on the Horizon
Okay, are you guys ready for Christmas? I am actually really close!
So I thought I would take just a moment to share some of our Christmas with all of you!
I used my decorative box that I love so much again! This time I built my advent wreath in it. I know not actually round, but I love the final look.
It really added something nice to the side table in my dining room.
This is the neighbor and teacher gifts I made this year. The baggie holds a great simmering potpourri that I made using a recipe I, of course, found on pinterest, though I did make quite a few changes to the original recipe. Mine goes like this:
2-3 slices each of dehydrated orange, lemon, and apple
3 cinnamon sticks
1 nutmeg
2 tbs. whole cloves
1 tbs. whole allspices
It really fills the house with a lovely aroma and I think it just keeps getting better each day. Yes, I just leave it on the oven and add water to re-heat it when I think about it.
The teachers gifts were double-walled glasses that I found. Then I simply sewed black ribbon onto white felt and added the belt buckle. On top I added a ribbon and a cute ornament. Inside I placed a bag of the simmering potpourri.
Have you seen the ornaments with the Mop and Glow and glitter? I kept seeing them and really liked the look, but to be honest I was worried about how well they would hold up. Well I made these back in October and they still look great! I have to say I am really pleased with them. Though, to be honest I don't use Mop and Glow so I bought it specifically for this project. It was pricier than I normally would like to spend and used VERY little of it. So my thought is find a friend who wants to do them too and split the cost or be prepared to make a LOT of them. Just me thinking out loud.
I love for my nativity to be center stage in my Christmas decorations. So, I love to spread it out across the antique buffet that we inherited from my husband's grandmother. (Now, I am busted that the TV is the center of my living room too. It is the way we live.) Over the 12 days following Christmas the Christ Child will make His appearance in the manger and all of my pieces will come into the middle. Don't you love the stocking hangars my husband made me a few years ago! I just wish that they were black.
Lastly, these are my presents this year! Yes, I spent a little more time than usual, but I loved the look of these. And, as usual, I took a few short cuts. I used white and silver duct tape with black electrical tape. Now this was all stuff I had around my house. The only things I bought was the all red paper (thank you Nutcracker Market) and some black ribbon for the larger packages where I doubled the white tape. I also, did not wrap it all the way around. To afraid I would run out before I got through them all. I did eventually wrap some in solid white paper and add red tape. They all got a ribbon tail with the recipients name on it. Still have a few more to wrap, but they will follow the same suit (haha!).
Hope your Christmas is coming along nicely with plenty of time to enjoy the real joy of the season! I look forward to sharing a few more moments with you before the big day! Merry Christmas!
So I thought I would take just a moment to share some of our Christmas with all of you!
I used my decorative box that I love so much again! This time I built my advent wreath in it. I know not actually round, but I love the final look.
It really added something nice to the side table in my dining room.
This is the neighbor and teacher gifts I made this year. The baggie holds a great simmering potpourri that I made using a recipe I, of course, found on pinterest, though I did make quite a few changes to the original recipe. Mine goes like this:
2-3 slices each of dehydrated orange, lemon, and apple
3 cinnamon sticks
1 nutmeg
2 tbs. whole cloves
1 tbs. whole allspices
It really fills the house with a lovely aroma and I think it just keeps getting better each day. Yes, I just leave it on the oven and add water to re-heat it when I think about it.
The teachers gifts were double-walled glasses that I found. Then I simply sewed black ribbon onto white felt and added the belt buckle. On top I added a ribbon and a cute ornament. Inside I placed a bag of the simmering potpourri.
Have you seen the ornaments with the Mop and Glow and glitter? I kept seeing them and really liked the look, but to be honest I was worried about how well they would hold up. Well I made these back in October and they still look great! I have to say I am really pleased with them. Though, to be honest I don't use Mop and Glow so I bought it specifically for this project. It was pricier than I normally would like to spend and used VERY little of it. So my thought is find a friend who wants to do them too and split the cost or be prepared to make a LOT of them. Just me thinking out loud.
I love for my nativity to be center stage in my Christmas decorations. So, I love to spread it out across the antique buffet that we inherited from my husband's grandmother. (Now, I am busted that the TV is the center of my living room too. It is the way we live.) Over the 12 days following Christmas the Christ Child will make His appearance in the manger and all of my pieces will come into the middle. Don't you love the stocking hangars my husband made me a few years ago! I just wish that they were black.
Lastly, these are my presents this year! Yes, I spent a little more time than usual, but I loved the look of these. And, as usual, I took a few short cuts. I used white and silver duct tape with black electrical tape. Now this was all stuff I had around my house. The only things I bought was the all red paper (thank you Nutcracker Market) and some black ribbon for the larger packages where I doubled the white tape. I also, did not wrap it all the way around. To afraid I would run out before I got through them all. I did eventually wrap some in solid white paper and add red tape. They all got a ribbon tail with the recipients name on it. Still have a few more to wrap, but they will follow the same suit (haha!).
Hope your Christmas is coming along nicely with plenty of time to enjoy the real joy of the season! I look forward to sharing a few more moments with you before the big day! Merry Christmas!
Wednesday, December 4, 2013
A Great Little Receipt Folder to keep you Organized for Christmas
Let's face it the idea of returning or exchanging something after Christmas makes most of us just cringe! And if you are like me the worst part isn't even the traffic or the lines. The worst part is finding the receipts! Well, at least, that was the case until a few years ago when I started keeping a receipt folder.
So today I want to share with you how to make a quick and easy receipt folder that you can personalize any way you like.
First, we are going to start with our supplies, standard size envelopes, cardstock (I like to use 2 coordinating pieces), a stapler, adhesive, scissors, ruler, a punch, and a paper clip clasp.
I always start by folding my envelopes in half and stacking them. Once they are stacked I fold them together and cut off the ends.
Once they are all trimmed they will fit into the stapler. So staple them in the crease. And add adhesive to the center envelopes. This covers the staples and when I open my folder it doesn't flop open. Now I take one card stock and cut it just a smudge larger than the width of my envelopes and about an inch longer on either end.
Now, here is an important part. You want to fold the cardstock at the fold of the envelopes, as well as, about half an inch away from that fold. This will give your envelopes room to plump up from all those gift receipts!
It is time for the adhesive. This can be a tape runner, double sided tape, glue stick, or glue gun. You decide, I used some double sided tape this year. Attach the last envelope on each end to your cardstock.
Now, grab your coordinating cardstock and cut it the width of your original cardstock. For the length you want it to have about and inch over your first cardstock, plenty of room for hanging over front and back, as well as, an extra half to one inch.
If you look at the picture you can see that I glued the back. (Then forgot to give myself the inch clearance on top so this one will have a tight fit once I am filling it.) Then I made the same folds on the top cardstock as I made on the bottom. Finally, attach your clasp to the front and make sure it all closes well.
You have successfully made it through the hard stuff. Okay, not really hard, but the hardest part of this project (that is if you still know where your receipts are for this year :).
Lastly, lets put in your tabs. I punched six red cardstock and three white (really just my coordinating paper flipped over). Then I cut the white ones in half and attached them to the red ones. Now attach the other half of the tab to each envelope.
It is a lot easier to label your tabs before you attach them. Now you are done! I hope this helps your holidays run smoothly!
Are you still with me? Now I know that several of my girlfriends are rolling their eyes and fussing that I love crafting just a little to much. GUILTY! I cannot begin to tell you how opening my purse and seeing my little goodie made just for me by me makes me feel! But lets face it not everybody feels the same. So for the non-crafters :( out there you can also adapt a small coupon organizer to do the same thing. No, this does not bring joy to my heart in the same way, but this is how I got started. So give it a try in a pinch!
Technical glitch: I understand right now people can't leave comments. Please know I am now aware of this and trying to correct it. Also, I would love for you to sign up to follow me at the top of the page! Thanks again for your patience!
Tuesday, December 3, 2013
Check out these great Holiday recipes!
So did everybody have a good Thanksgiving? I know ours was great!
Now, I know the holiday is over, but I wanted to share with you some recipes that I tried and were really fabulous! These would be great to pin for next year or for those who do the traditional Christmas dinner these will definetly be a welcomed addition.
The first was the Sweet Potatoes, yum!
http://www.pinterest.com/pin/46865652346399286/
The only thing I changed on this was to cut it in half. Now this is really sweet, but to me not that sugary sweet of standard marshmellow topped casseroles. Also, I really liked the texture of this dish, since it had some body to it!
Next, was the stuffing! Now you have to realize that we have a family recipe that has been around forever that we all love. So to say the least I was a little weary to try something new. The thing is this was a crockpot recipe and I love the idea of using my crockpot and not taking up oven space or having to keep something warm. And this recipe is very similar to my family recipe so I decided to give it a try.

I am so glad that I did! I really liked this stuffing, but I have to tell you that I did make some changes from this original recipe here. I did cut the milk in half. I also used Progesso's Tuscany chicken broth and, of course, I used Old Bay for my poultry seasoning. The most distinct change that I made, though, was to the cooking. I did cook it for 2 hours on high, but after an hour on low it just looked WAY to runny for my family's taste. So I pulled it out of the crockpot liner and put it into a baking dish. Then I just popped it into the oven with the sweet potatoes!
It browned up beautifully on top and firmed up wonderfully! Now, I must tell you that I truly love crockpot liners, but I do feel that thing have a tendency to just stay juicier in them. So my problem with the consistency could very well be just me. Either way, I was thrilled with the final product!
Now, I know the holiday is over, but I wanted to share with you some recipes that I tried and were really fabulous! These would be great to pin for next year or for those who do the traditional Christmas dinner these will definetly be a welcomed addition.
The first was the Sweet Potatoes, yum!
The only thing I changed on this was to cut it in half. Now this is really sweet, but to me not that sugary sweet of standard marshmellow topped casseroles. Also, I really liked the texture of this dish, since it had some body to it!
Next, was the stuffing! Now you have to realize that we have a family recipe that has been around forever that we all love. So to say the least I was a little weary to try something new. The thing is this was a crockpot recipe and I love the idea of using my crockpot and not taking up oven space or having to keep something warm. And this recipe is very similar to my family recipe so I decided to give it a try.
I am so glad that I did! I really liked this stuffing, but I have to tell you that I did make some changes from this original recipe here. I did cut the milk in half. I also used Progesso's Tuscany chicken broth and, of course, I used Old Bay for my poultry seasoning. The most distinct change that I made, though, was to the cooking. I did cook it for 2 hours on high, but after an hour on low it just looked WAY to runny for my family's taste. So I pulled it out of the crockpot liner and put it into a baking dish. Then I just popped it into the oven with the sweet potatoes!
It browned up beautifully on top and firmed up wonderfully! Now, I must tell you that I truly love crockpot liners, but I do feel that thing have a tendency to just stay juicier in them. So my problem with the consistency could very well be just me. Either way, I was thrilled with the final product!
Friday, November 22, 2013
Wisdom Teeth No More
Well today my oldest son had his wisdom teeth removed. So far all has gone well and he is happily snoozing in a narcotic fog LOL! But, I did want to share a wonderful pin that helped get us through today! http://www.pinterest.com/pin/46865652346358658/

These little goodies really work. I was able to gently shape them to his face and being a little mushy allowed them to not poke or have hard spots like traditional ice packs.
I actually made 4 of them so that I could always have 2 hardening up in the freezer. The only thing I would probably change would be to double bag them as one leaked some once it started to defrost. Granted it was an easy fix just re-zip the bag, but who wants to smell like rubbing alcohol.
So that is all for today, as I am heading back to my nursing duties! Hope you all have a wonderful and blessed weekend!
These little goodies really work. I was able to gently shape them to his face and being a little mushy allowed them to not poke or have hard spots like traditional ice packs.
I actually made 4 of them so that I could always have 2 hardening up in the freezer. The only thing I would probably change would be to double bag them as one leaked some once it started to defrost. Granted it was an easy fix just re-zip the bag, but who wants to smell like rubbing alcohol.
So that is all for today, as I am heading back to my nursing duties! Hope you all have a wonderful and blessed weekend!
Subscribe to:
Posts (Atom)