Hi, everybody! And welcome to my brand new blog. I ask for your patience and understanding as I learn to maneuver the blogging world. I am the first to admit that technology is not really my thing, but I hope I can share some fun information that will make my learning curve worth riding! LOL!
The plan is to share some of my own adventures in crafting, cooking and life, while exploring some of the fun things that I can't help pinning! Stacey will be joining me with some great fun of her own and her mom, Sharon, will drop by sometimes, too.
So let the fun begin!
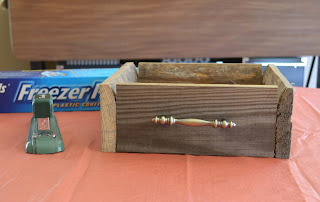
I want to share with you some of the ideas I've had for the new "boxes" my wonderful hubby made me.
He actually made these from an old pallet I had here at the house. (Okay, so I still don't have a compost pile) The handles all came from the Re-store. If you haven't been there keep coming back and you will get a tour soon. I love to recycle or up cycle as a lot of people call it. Lets face it times are tough everywhere and I am, to be honest, cheap!
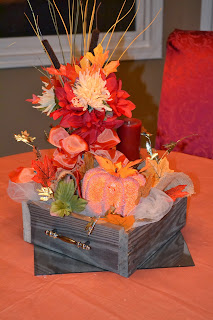
He originally made them for me to be the centerpieces at a wedding shower I recently hosted. They came out so wonderfully that I wanted to reuse at least one of them. So my fall centerpiece idea was born.
I am going to quickly walk you through the steps I used to make this centerpiece. First, I gathered an assortment of things that I had around the house. No I didn't use them all but I like to have a lot of options as I am assembling. Often what I think is going to be perfect just doesn't quite work so I like to have something else at my fingertips, just in case a change is in order.
And actually, there is one more item that I ended up digging for that didn't make it in the picture and that was the lid to a mason jar. Do you see it in the arrangement? That is actually what my candle is sitting on!
The next step for my assembly was the tulle. It is just about 1/2 a yard that I bought at Wal-Mart (Don't you LOVE that they brought their material back? It's still not what it was but I'll be happy with what I can get.) I just opened it up and stuffed it in. I intend to do a lot of pushing and pulling on it so there is no reason to fuss with it to much right now.
Next, I added the large pieces that I knew I wanted! That included a little pedestal candle stick holder for the pumpkin. A tall candle stick for the small pillar candle. And a jar for my flowers. Now I did try several different bottles and small vases before I settled on this recycled Starbucks bottle.
I don't know if you can really see in the options picture but I have several different candles stick holders and bottles. I have a variety of both of these items around my house. Alright, to be honest at least a box of each! I also, love cake stands. To the point that I must always be limiting myself. I generally want clear ones of each. They give me the most flexibility in decorating. I can always add color in and around them without them taking away from whatever theme I have going on. And lets not forget they SPARKLE!
Once the large pieces were in I decided I really wanted some more texture for my fall theme. So I took a small piece of burlap and added some gold wired garland. The wire helps to give the burlap a little more body so it won't be slipping down into the box.
Now the real fun begins, the color and pretties! I placed the pumpkin first since I knew that was going in. Next, I played with some candle options. Deciding that the burgundy was a good color balance for that side and I liked the size. Now I had to decide what to place it on. The candlestick it self was just to thin. And the big plate I had took up to much room. So I went digging and came up with this mason jar lid. I loved that additional touch of gold that it added as well as the size.
To attach the candle to the stick I used some 3m repostionable putty that I have. It keeps it from moving around and will come off when I am done!
Then I added the silk flowers and the bow. I really intend for this piece to be seen from the front, but I didn't want the back to be ugly! So I did add a few more flowers for the back to fill it out. I also, added some clear rocks for balance.
Now I do want to add a few cautionary thoughts if you decide to make this centerpiece yourself. First, my box does not have a bottom. So I set it on a mirror that I can easily lift off it I need it to come off the table. Next, and MOST importantly is that I do not intend to actually burn this candle. It would definitely be a fire hazard this close to the silk flowers.
Lastly, I added some fall leaves and VIOLA! we are done!
I hope this inspires you to look around at what you already have and then make yourself something that makes you smile like my centerpiece does each time I look at it.
Note: I have a few more ideas for these boxes that you will see in future post!


No comments:
Post a Comment